
Crochet Cloud Keychain Pattern Free - Sleepy Amigurumi
Your second cloud goes faster than the first, which takes two to three hours on a 1.5 mm hook. One solid colour runs through each crochet cloud keychain, with raised white stitches for cheeks and thin black cotton for the sleepy lashes and mouth.
Sleepy stitched eyes turn this Crochet Cloud Keychain Amigurumi into an easy spring make for market tables and school bags. Hook a few in bright colours before Mother's Day or end of term. Teachers love them. The Crochet Cloud Keychain Amigurumi also works in soft pastels for Easter baskets and party favours.
Crochet Cloud Keychain Amigurumi

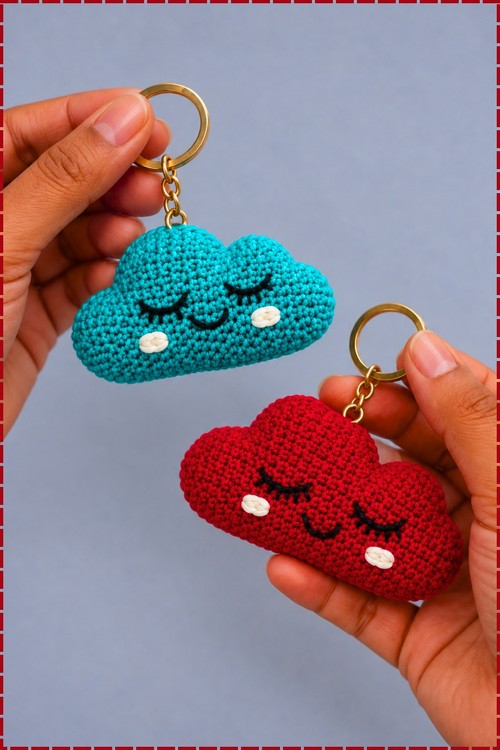
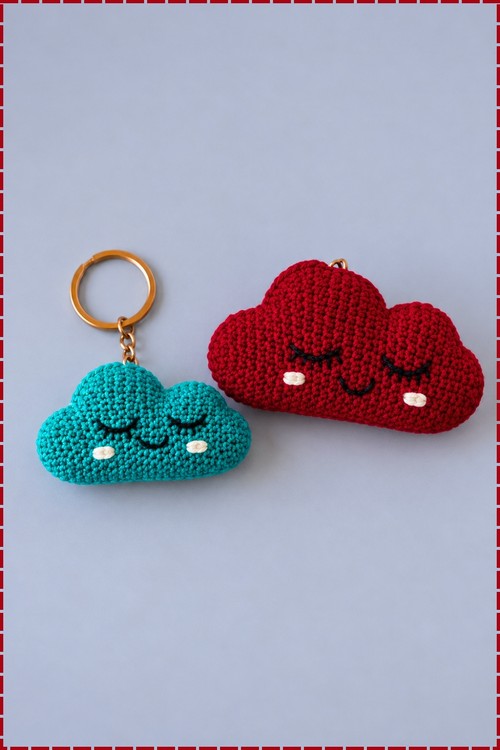
Worked in the round from a single magic ring, this crochet cloud keychain builds its three bumps through stitch height alone, climbing from single crochet up to double crochet and dropping back down. No separate pieces ever get sewn on, so the whole puffy shape emerges from one continuous piece. Mercerized cotton at a tiny hook creates the dense fabric that keeps each bump crisp instead of saggy. My pair turned out in bright turquoise and deep red, both wearing white cheeks and sleepy closed eyes. Gold keyrings finish them off, and an afternoon is enough for one.
The Story Behind These Two
They started as one. I made the turquoise cloud on a slow Sunday, meaning to clip it to my keys and leave it at that, and by the time I had embroidered the little closed eyes I already knew there would be a second. The red one came the next evening. Something about a sleeping cloud sitting in your palm makes you want a matching one, and the two of them together read like a pair of tiny weather moods rather than duplicates of the same toy.
Why I love this one: the face does all the work, and you can change the entire personality of the cloud with four small stitches.
Materials and Tools
- Mercerized cotton yarn in your main colour. I used bright turquoise for one cloud and deep red for the other, one solid colour per cloud with no colour changes anywhere.
- A small amount of white yarn for the cheeks. My version uses white rather than pink, and the cheeks sit as two short raised stitches low on the face.
- Thin black cotton thread for the closed eyes, lashes and mouth.
- 1.5 mm crochet hook.
- Gold keyring with a short connecting chain. Mine attach through the top of the middle bump.
- Fiberfill stuffing, tapestry needle, scissors.
Difficulty and Time
The pattern itself is easy, but the hook is tiny and the round count is long, so this lands closer to intermediate in patience than in skill. From making both of mine, I would budget two to three hours for a first cloud and a little less for the second once the bump rounds make sense. Finished size depends entirely on your yarn and hook, and mine sit comfortably in a palm, though I would treat that as a rough guide rather than a measurement.
Abbreviations Used
- MR means magic ring.
- ch means chain.
- sc means single crochet.
- inc means increase, two single crochet in the same stitch.
- dec means decrease, two stitches worked together.
- hdc means half double crochet.
- dc means double crochet.
- sl st means slip stitch.
The Pattern
Beginning and Base
- Round 1: Make a magic ring and work 6 sc into it. Join with a sl st to close the ring and ch 1 (6 sts). Pull the ring fully closed now, since a 1.5 mm hook leaves no room to fix a gap later.
- Round 2: Inc in every stitch around (12 sts).
- Round 3: Work [1 sc, 1 inc] 6 times (18 sts).
- Round 4: Work [2 sc, 1 inc] 6 times (24 sts). The piece should still lie flat like a small disc.
- Rounds 5 to 8: Work 1 sc in each stitch around for 4 rounds (24 sts per round). These straight rounds turn the flat disc into a shallow cup, which becomes the back of the cloud.
Forming the Cloud Bumps
- Round 9: Work 4 sc, 6 inc, 14 sc (30 sts). All six increases sit together in one place, which is what starts pushing the first bump out to one side.
- Round 10: Work 1 sc in each stitch around (30 sts).
- Round 11: Work 9 sc, [1 sc, 1 inc] 6 times, 9 sc (36 sts). The widening section is now centred, ready for the tall stitches.
- Round 12: Work 9 sc, 3 hdc, 12 dc, 3 hdc, 9 sc (36 sts). Stitch height alone lifts the middle bump here, so keep the double crochet loose and even or the bump tilts.
- Round 13: Work 13 sc, 3 hdc, 4 dc, 3 hdc, 13 sc (36 sts). A narrower band of tall stitches carves the dip between bumps.
- Round 14: Work 10 sc, 3 hdc, 10 dc, 3 hdc, 10 sc (36 sts). The second bump rises on the opposite side from the first.
- Round 15: Work 14 sc, 8 hdc, 14 sc (36 sts). Half double crochet smooths the transition so the top edge reads as a curve rather than a step.
- Round 16: Work 1 sc in each stitch around (36 sts). Hold the piece at arm's length here. All three bumps should be visible along the top edge before you start decreasing.
Shaping and Tapering
- Round 17: Work 12 sc, 6 dec, 14 sc (30 sts). Grouped decreases pull in the underside of the cloud.
- Round 18: Work 1 sc in each stitch around (30 sts).
- Round 19: Work 8 sc, 6 dec, 10 sc (24 sts).
- Round 20: Work 9 sc, 2 dec, 11 sc (22 sts).
- Round 21: Work 7 sc, 6 inc, 9 sc (28 sts). The increases come back in to shape the lower right bump of the cloud.
- Round 22: Work 9 sc, 6 hdc, 13 sc (28 sts).
- Round 23: Work 13 sc, 3 hdc, 12 sc (28 sts).
- Rounds 24 to 27: Work 1 sc in each stitch around for 4 rounds (28 sts per round). The cloud starts looking like a flattened puff at this point.

Closing and Finishing
- Round 28: Work 9 sc, 6 dec, 7 sc (22 sts).
- Round 29: Work 7 sc, 4 dec, 7 sc (18 sts).
- Rounds 30 to 31: Work 1 sc in each stitch around for 2 rounds (18 sts per round).
- Stuff the cloud firmly with fiberfill before the opening closes. Push stuffing into each bump separately with the back of your hook, because an unstuffed bump collapses and the whole cloud reads as a lump.
- Round 32: Work [1 sc, 1 dec] repeat around (12 sts).
- Round 33: Dec around until the opening is fully closed, fasten off, then pull the thread tight through the centre with a tapestry needle and bury the end inside.
Face and Assembly
- Embroider the eyes with thin black cotton thread as two curved sleeping lines across the centre of the cloud, spaced apart on either side of where the smile will sit. Mine also carry three short lashes stitched off the outer end of each eye, which is what gives them the sleepy expression.
- Embroider a small curved smile in black between and slightly below the two eyes. Keep it short. A wide mouth makes the face look surprised rather than peaceful.
- Embroider the cheeks in white rather than pink, making two short horizontal stitches below and slightly outside each eye. Work them over the same two or three stitches a few times so they sit raised against the coloured background.
- Sew the keyring securely to the top of the centre bump using matching thread. Mine hang from a short gold chain attached to a round gold ring, and stitching through several stitches rather than one spreads the pull so the cloud does not distort.
- Add a hanging cord instead if you prefer, chaining until the loop reaches your preferred length and sewing both ends into the top bump.
Tips and Troubleshooting
Keep the tall stitches loose. At 1.5 mm the fabric is already tight, and a strangled double crochet makes the bump pucker instead of pop. If your cloud looks lopsided, count Round 9 again, since all six increases sitting in the wrong place shifts every bump that follows. Mark the front of your work early with a scrap of contrasting yarn, because the bump rounds only make sense if you know which side you are looking at. Stuff a little less than feels right if the stitches start showing white gaps, and always embroider the face before the final closing rounds if you want to reach inside to secure the thread ends.
Yarn Substitution
Mercerized cotton is doing real work here. It gives the sheen and the stiffness that hold each bump apart, and both of mine keep their shape without any wire or stiffener. Velvet yarn also works and turns the cloud into a small squishy pillow, though the bumps soften considerably and the embroidered face sinks into the pile. Regular cotton is fine with a slightly larger hook. Acrylic tends to go floppy at this size, so if that is what you have, drop a hook size and stuff firmly.
Customization Ideas
- Make a set in different colours rather than a matching pair. Turquoise and red work together precisely because they do not match.
- Swap the white cheeks for pink if you want the softer look the original suggests.
- Change the face entirely. Open round eyes and a small o mouth give a startled cloud, while a single closed eye reads as a wink.
- Embroider tiny raindrops in a paler thread along the lower edge for a rain cloud version.
- Skip the keyring and sew a hanging loop instead, chaining until the loop is the length you want for a nursery mobile or a rear view mirror.
- Work the same pattern in a smaller cotton for a mini version to string together as a garland.

Frequently Asked Questions
Why does my cloud only have two bumps? The third bump comes from Round 21, where six increases are worked back in after all the tapering. It is easy to read that round as a mistake and skip it. Work it exactly as written and the lower bump appears.
Can I use a bigger hook? Yes, and the pattern works fine at 2.5 mm or 3 mm with matching yarn. Expect a noticeably larger cloud and a softer fabric, and stuff more firmly than you think you need to so the bumps stay defined.
How do I stop the embroidered face from puckering? Work the face after stuffing, not before, and keep the black thread relaxed as you pull each stitch through. Pulling tight drags the surrounding stitches inward and dents the cloud around the eyes.
Will the keyring pull the cloud out of shape? Not if you sew through several stitches at the top bump rather than looping through one. Spreading the attachment across a small area distributes the weight, and both of mine have held their shape.