
Don Ramon Crochet Amigurumi Doll Free Pattern
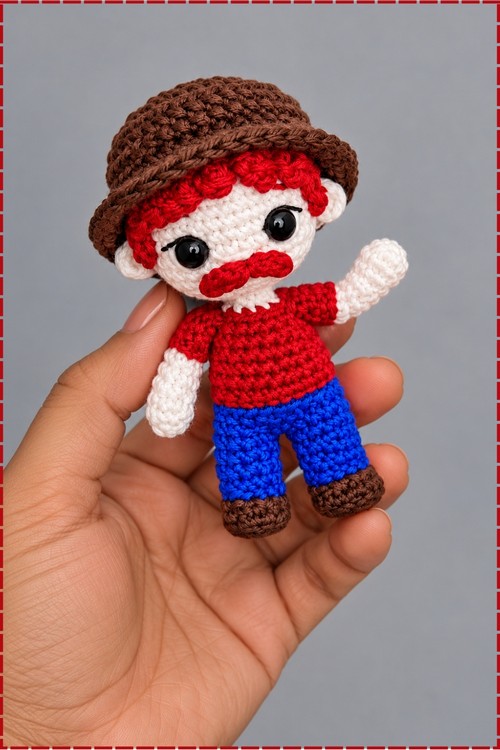
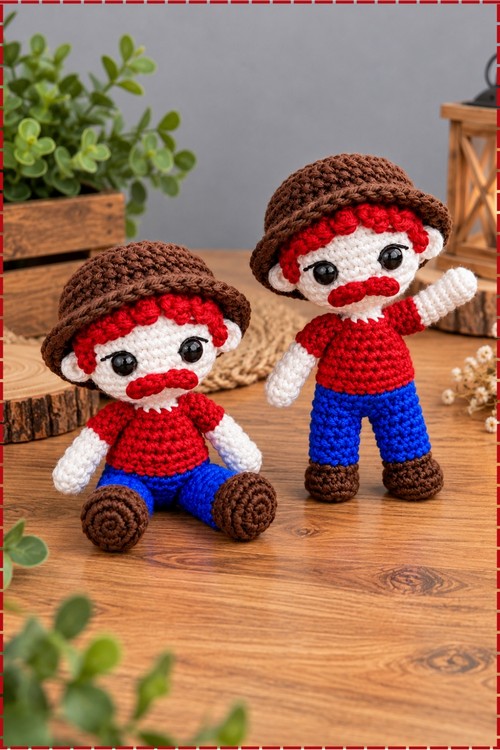
One continuous piece carries this crochet Don Ramon doll from brown shoes up through blue trousers and a red shirt, with slip stitch colour change rounds giving crisp ridges. The thumb sized figure needs 1 mm cotton thread and a 2.0 mm hook.
That moustache and the tilted hat give the Crochet Don Ramon Doll a grumpy, put upon look that lands instantly. Eyes wide, mouth hidden. The Crochet Don Ramon Doll carries attitude without a single stitched frown, which is the whole trick of it.
Crochet Don Ramon Doll
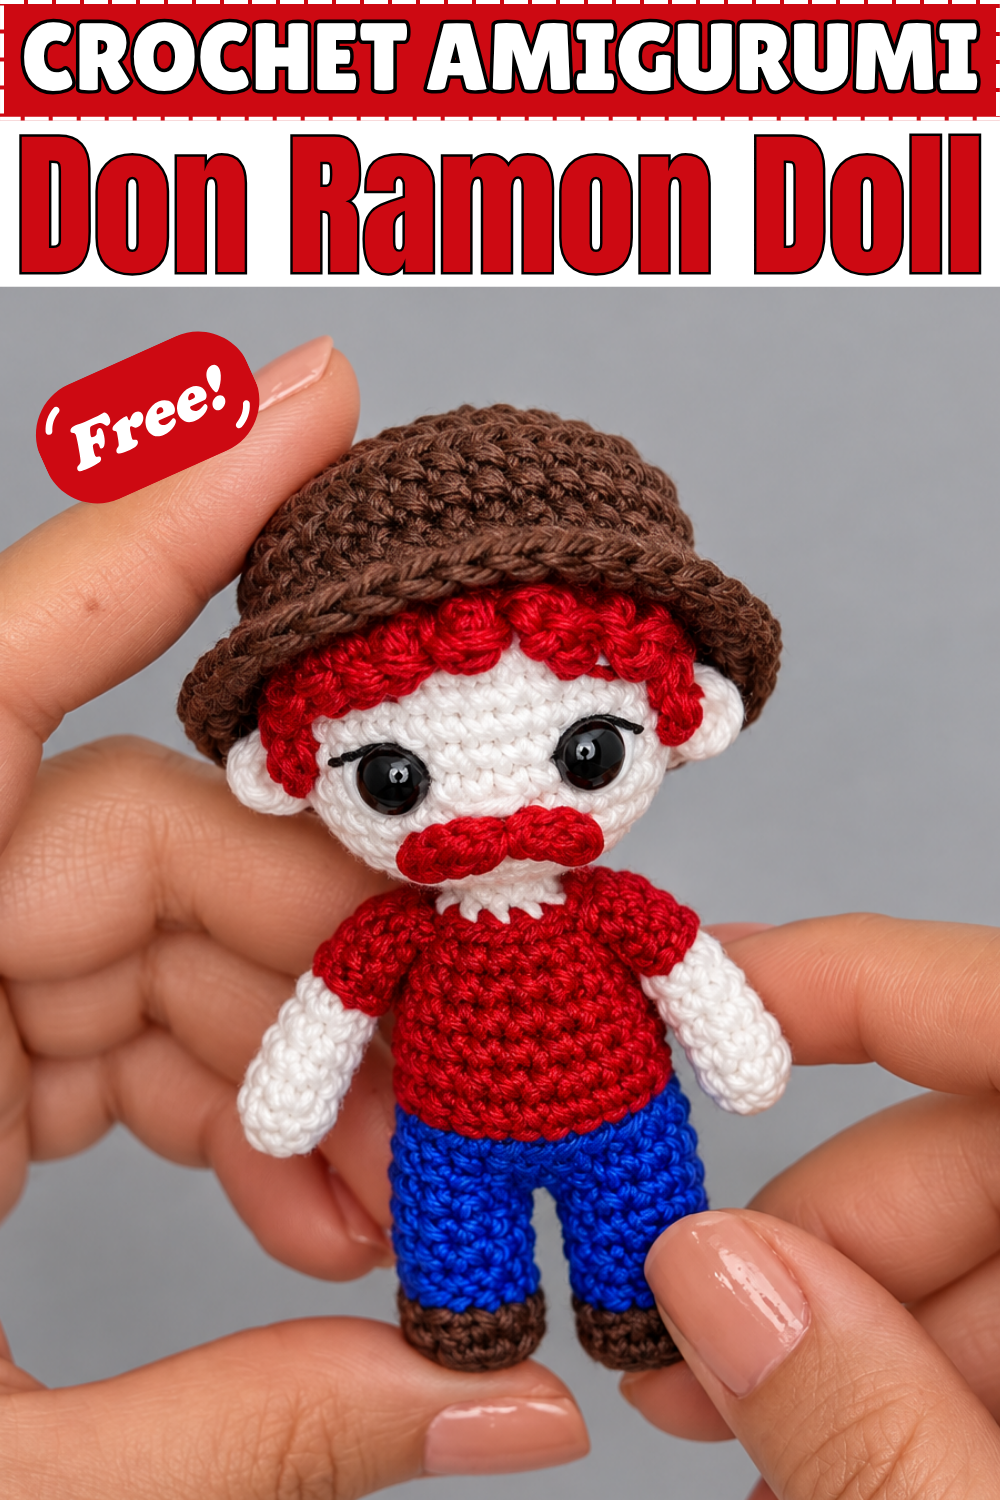
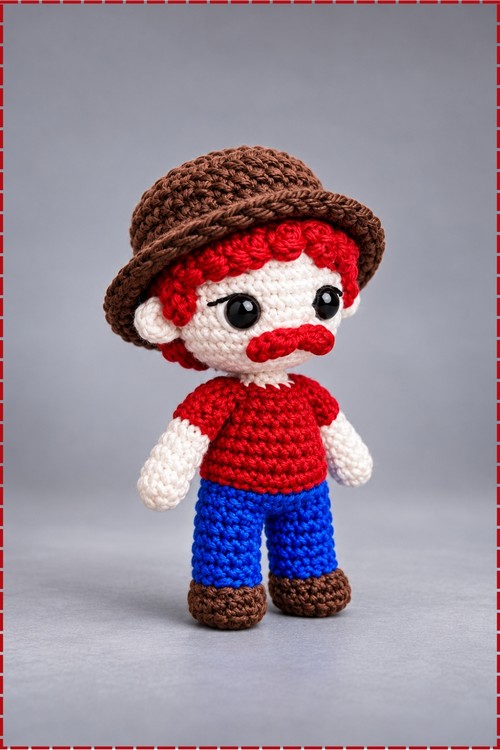
Worked from the shoes upward in one continuous piece, this crochet Don Ramon doll never needs a body seam, which is what keeps such a small figure looking neat. Slip stitch colour change rounds do the heavy lifting here, giving the crisp ridges where the shoes meet the trousers and the trousers meet the shirt. Mine stands about as tall as a thumb, so every stitch shows and tension matters more than usual. Red hair and a matching mustache sit under a brown bucket hat that lifts off if you leave it unglued. Patience helps far more than skill on this one.
A Note Before You Start
I will be honest about the scale. This doll is made with 1 mm cotton thread on a 2.0 mm hook, and at that size the stitches are tiny enough that good light genuinely changes how the finished piece looks. The pattern itself is not difficult, since nearly everything is single crochet. What it asks for is a steady hand during assembly, because the face sits in an area smaller than a coin and a millimetre of eye spacing changes the whole expression. My first attempt had the eyes one stitch too close together and it looked completely wrong, so take your time at that step.
Materials and Tools
- 1 mm cotton thread in white for the face, head, hands, and arms
- Red cotton thread for the shirt, the hair, and the mustache
- Denim blue cotton thread for the trousers
- Brown cotton thread for the shoes, the trouser cuffs, and the bucket hat
- 2.0 mm crochet hook
- Safety eyes, 7 mm, in black
- Small amount of black thread for the eyebrows and lashes
- Fiberfill stuffing
- Tapestry needle, scissors
- Hot glue or fabric glue, optional for securing the hat
- Pink blush, optional
Difficulty and Time
Intermediate, mostly because of the scale rather than the stitches. Everything is single crochet, increases, decreases, and a few half double crochet in the hat brim. From my own go at it, the doll took one long evening to crochet and a good chunk of the next for the face, hair, and hat. The finished height comes out around 9 cm or 3.5 inches with the thread and hook listed, though your tension will shift that by a few millimetres either way.
Beginner Technique Notes
Several rounds here are unnumbered slip stitch rounds worked in back loops only at a colour change. They do not add height. What they do is create a sharp horizontal ridge, which is how the shoes separate cleanly from the trousers and the trousers from the shirt. Work them loosely, because tight slip stitches pull the whole round in and make the next round painful to get into.
After each slip stitch round you work into the top loops of those slip stitches rather than into the stitch as normal. Look for the strand sitting on top of each slip stitch and go under that one.
Back loop only means the back strand of the stitch, and front loop only means the front strand. Both appear in the hat, where back loop only makes the flat top edge and front loop only leaves a row of free loops that the hair attaches into later.
Work in continuous spirals unless a round says to join, and keep a marker in the first stitch of every round. At this size you will not find your place by eye.
The Pattern
Legs and Body
- Leg 1, Round 1 in brown: Make a magic ring, work 10 single crochet into it, join with a slip stitch, and tighten the ring. This flat disc is the sole of the shoe. (10)
- Round 2 in brown: Working in back loops only, work 10 single crochet, changing to blue on the last stitch. (10)
- Unnumbered colour change round: Working in back loops only with blue, work 10 slip stitches, then cut and secure the brown thread. The ridge this leaves is the top edge of the shoe, which is exactly where my doll shows the brown meeting the blue. (10)
- Round 3: Working into the top loops of the blue slip stitches, work 10 single crochet. (10)
- Rounds 4 to 5: Work 10 single crochet in each round. (10)
- Fasten off and cut the yarn on the first leg only.
- Work the second leg the same way through Round 5, but do not cut the yarn. Work 2 extra single crochet to bring you into line with the joining point.
- Round 6: Chain 1, pick up the first leg and join with 1 single crochet roughly 2 or 3 stitches back from where you fastened off, work 10 single crochet across the first leg, 1 single crochet into the joining chain, 10 single crochet across the second leg, then 1 single crochet into the back of the joining chain. Check that both shoes point forward before you join, since a twisted leg is not fixable once the body is built on top. (22 sts total)
- Rounds 7 to 8: Work 22 single crochet in each round, changing to red on the last stitch of Round 8. (22)
- Stuff both legs firmly now, while you can still reach down into them with the blunt end of your hook.
- Unnumbered colour change round: Working in back loops only with red, work 22 slip stitches, then fasten off the blue thread. (22)
- Round 9: Working into the top loops of the red slip stitches, work 22 single crochet. This is where the shirt begins on my doll, and the ridge reads as the waistline. (22)
- Round 10: Work 9 single crochet, then 1 decrease, and repeat that sequence 2 times around. (20)
- Round 11: Work 8 single crochet, then 1 decrease, and repeat that sequence 2 times around. (18)
- Round 12: Work 18 single crochet. (18)
- Round 13: Work 7 single crochet, then 1 decrease, and repeat that sequence 2 times around. (16)
- Round 14: Work 16 single crochet, changing to white on stitch 16. (16)
- Stuff the body firmly. Soft stuffing here lets the head tip backward once it is finished, and there is no way to add more later.
Neck and Head
- Round 15: Working in back loops only, work 2 single crochet then 1 decrease, repeating that sequence 4 times around, then cut the red thread. This is the neck, and it pulls in sharply on purpose. (12)
- Round 16: Work 1 single crochet, then 1 decrease, and repeat that sequence 4 times around. (8)
- Round 17: Work 8 increases around. The head starts flaring straight out from the narrow neck here. (16)
- Round 18: Work 1 single crochet, then 1 increase, and repeat that sequence 8 times around. (24)
- Round 19: Work 2 single crochet, then 1 increase, and repeat that sequence 8 times around. (32)
- Rounds 20 to 28: Work 32 single crochet in each round for all nine rounds. The head is deliberately large against the body, which is what gives the doll its proportions. (32)
- Insert the 7 mm safety eyes between Rounds 22 and 23, spaced 6 stitches apart, then flatten the backs of the stems with a lighter before stuffing for extra security. Mine sit low on the face with plenty of forehead above them, which leaves room for the hair.
- Sew the arms to the sides of the body between Rounds 14 and 15, which is easier to do now than after the head closes.
- Round 29: Work 2 single crochet, then 1 decrease, and repeat that sequence 8 times around. (24)
- Round 30: Work 1 single crochet, then 1 decrease, and repeat that sequence 8 times around. (16)
- Stuff the head firmly with fiberfill, pushing small pieces in with tweezers or a hook end so it fills evenly without lumps.
- Round 31: Work 8 decreases around. (8)
- Fasten off, weave the tail through the outer loops of the remaining 8 stitches, pull tight to close, and hide the end inside the head.
Arms, Make 2
- Round 1 in white: Make a magic ring and work 6 single crochet into it. (6)
- Rounds 2 to 6: Work 6 single crochet in each round for all five rounds. (6)
- Unnumbered colour change round: Change to red and work 6 slip stitches into both loops as normal. (6)
- Round 7: Working into the top loops of the slip stitches, work 6 single crochet. (6)
- Round 8: Work 6 single crochet. The red section is the short sleeve, which on my doll sits just below the shoulder. (6)
- Leave the arms unstuffed so they hang naturally against the body, then fasten off leaving a tail for sewing.
Bucket Hat, in Brown
- Round 1: Make a magic ring, work 8 single crochet into it, and join with a slip stitch. (8)
- Round 2: Work 8 increases around. (16)
- Round 3: Work 1 single crochet, then 1 increase, and repeat that sequence 8 times around. (24)
- Round 4: Work 2 single crochet, then 1 increase, and repeat that sequence 8 times around. (32)
- Round 5: Work 7 single crochet, then 1 increase, and repeat that sequence 4 times around. (36)
- Round 6: Working in back loops only, work 36 single crochet. This creates the flat top contour and the crisp edge you can see around the crown of my hat. (36)
- Rounds 7 to 8: Work 36 single crochet in each round. (36)
- Round 9: Working in front loops only, work 36 single crochet. Do not skip this one, since the inner loops it leaves free are what the hair attaches into. (36)
- Round 10: Work 36 half double crochet to form the brim. The taller stitches flare outward on their own, giving the rolled bucket hat edge. (36)
- Fasten off and weave in the ends, or leave a long tail if you plan to sew the hat to the head rather than glue it.
Hair, in Red
- Work directly into the inner exposed loops left from Round 9 of the hat.
- Count 13 loops back from the back seam and attach red thread with a slip knot.
- First sideburn: Chain 4, then starting in the second chain from the hook work 3 slip stitches down the chain, then slip stitch into the next base loop.
- Front hair: Chain 3, then starting in the second chain work 2 half double crochet down the chain, skip 1 base loop, and slip stitch into the next loop. Repeat this whole sequence 5 times in total to make five bangs. On my doll these curl forward slightly and sit just above the eyebrows.
- Second sideburn: Chain 4, then starting in the second chain work 3 slip stitches down the chain, then slip stitch into the adjacent base loop.
- Fasten off and weave in the ends. My hair is red rather than black, which changes the whole look of the doll and is the detail people notice first.
Ears, Make 2 in White
- Make a magic ring and work 3 single crochet into it.
- Do not join into a circle. Pull the ring tight so the piece forms a small semi circle.
- Fasten off leaving a tail for sewing, then sew each ear to the side of the head 3 stitches away from the eye on that side.
Mustache, in Red
- Chain 6.
- In the second chain from the hook, work 1 slip stitch.
- In the next chain, work 1 single crochet.
- Work 1 slip stitch around and under the middle chain loop to pull the centre in.
- In the next chain, work 1 single crochet.
- In the last chain, work 1 slip stitch.
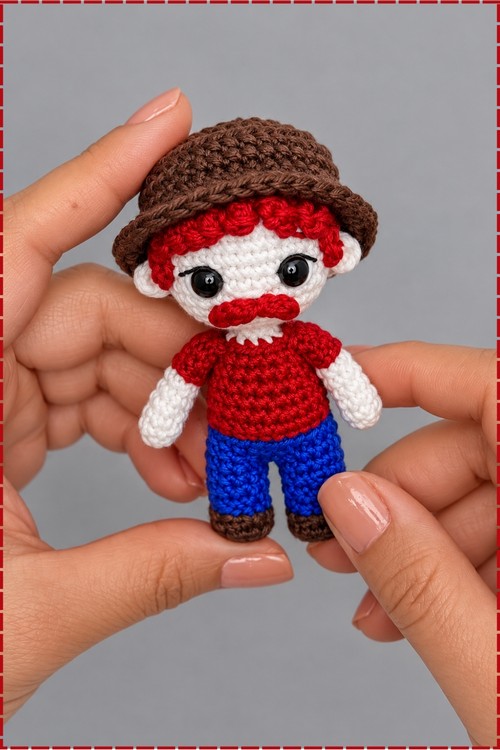
- Fasten off, then glue or sew the mustache directly under the nose. Mine is red to match the hair and sits wide across the face, which is the single feature that makes the character recognisable.
Assembly and Face
- Embroider a small nose in white between the eyes, keeping the stitches shallow so the face does not pucker.
- Embroider the eyebrows in black as two short curved lines above the eyes, angled slightly inward.
- Add a few fine black lashes at the outer top edge of each eye. Mine has three short strokes on each side, which gives the eyes their shape without needing anything larger.
- Add optional white highlights to the eyes if you want extra life in them.
- Position the mustache directly beneath the nose and attach the ears 3 stitches out from each eye.
- Place the hat with the hair already attached onto the head, turning it so the sideburns fall just in front of the ears, then secure it with glue or a few hidden stitches.
- Apply a little pink blush to the cheeks if you like, though my doll's white face and red features already carry plenty of contrast.
Tips and Troubleshooting
- Work in strong light. At 1 mm thread the difference between the front and back loop is about a hair's width, and getting it wrong on the hat ruins the hair attachment row.
- Keep the slip stitch colour change rounds loose. Tight ones cinch the body in and leave you fighting to get your hook into the top loops on the next round.
- Stuff in tiny amounts using tweezers. A single oversized piece of fiberfill shows as a lump through thread weight fabric.
- Place the eyes and look at the face before flattening the stems. Once those backs are melted the eyes are permanent, and spacing is everything on a face this small.
- Sew the arms on before closing the head. Reaching into the body through the neck opening is far easier than trying to anchor them afterwards.
- Hold the hat on with a couple of stitches rather than glue if you want it removable. Glue soaks into cotton thread and leaves a visible mark.
- Count every round out loud at this scale. Losing one stitch in a 10 stitch round throws the whole leg off noticeably.
Yarn Substitution
Fine cotton thread gives the tight stitch definition and the crisp colour change ridges that make this doll work. Any 1 mm cotton thread will do with the 2.0 mm hook. If the scale feels too small, move up to a 4 ply cotton with a 2.5 mm or 3.0 mm hook and every stitch count still works, producing a doll closer to 15 cm. Keep all the pieces in the same thread so proportions stay right, and avoid anything with a halo since the face embroidery and the tiny ears disappear completely in fuzzy yarn.
Customization Ideas
Colour is doing almost all the work on this doll, so changing it changes the character. My red shirt, red hair, and brown hat are a departure from the black and grey of the original, and the whole figure reads differently because of it. Swapping the trousers to brown or grey gives a more muted look. The hat can be any colour, and leaving it unsecured means you can make several and swap them. A plain face with no mustache turns the same base pattern into a generic doll you can dress however you like. Skin tone thread instead of white makes it read as a traditional doll rather than a stylised one. You can also make the hair longer by chaining more before working back down.
Frequently Asked Questions
Why does the pattern have unnumbered rounds? Those are slip stitch rounds worked at the colour changes. They do not add height to the piece, which is why they sit outside the numbering, but they create the visible ridges between the shoes, trousers, and shirt. Skipping them loses those clean dividing lines.
Can I make this without safety eyes? Yes, and at this scale embroidered eyes work surprisingly well. Fill two small black ovals in the same position between Rounds 22 and 23 with 6 stitches between them. That is also the safer option if the doll is going to a child.
My doll's head leans backward. How do I fix it? That is nearly always understuffing in the body just below the neck. The neck decreases down to 8 stitches, so the body needs to be packed firmly right up to that point to support the much larger head.
How do I attach the hair if I forgot the front loop only round? If Round 9 of the hat was worked normally, the free loops do not exist. You can still sew the hair on by stitching each bang directly to the hat edge, though it takes longer and the result sits slightly flatter.
Is this suitable for a beginner? The stitches are, but the scale is not. If you have made a few amigurumi before and are comfortable with colour changes, you will manage. If this is your first doll, try it in a thicker yarn with a larger hook first using the same counts.