
Crochet Grinch Doll Free Pattern In a Santa Suit - Mini Amigurumi For Christmas
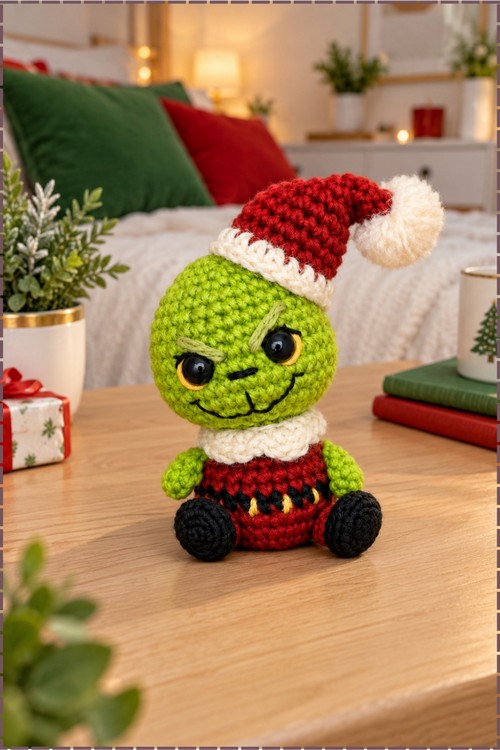
Crocheters ready for mid round colour changes will enjoy the crochet baby Grinch doll, with bubble stitch boots and hands under its Santa suit. Sport weight yarn on a 2.0 mm hook makes a 7 cm figure, and the face embroidery takes longest of its four to five hours.
Hat tipped and boots planted, the crochet baby grinch doll shows up right when the tree goes up in December. Hang one on a branch or stand it by the stockings. Holiday markets sell out of these in a week. Start the crochet baby grinch doll early, because December fills up fast.
Crochet Baby Grinch Doll
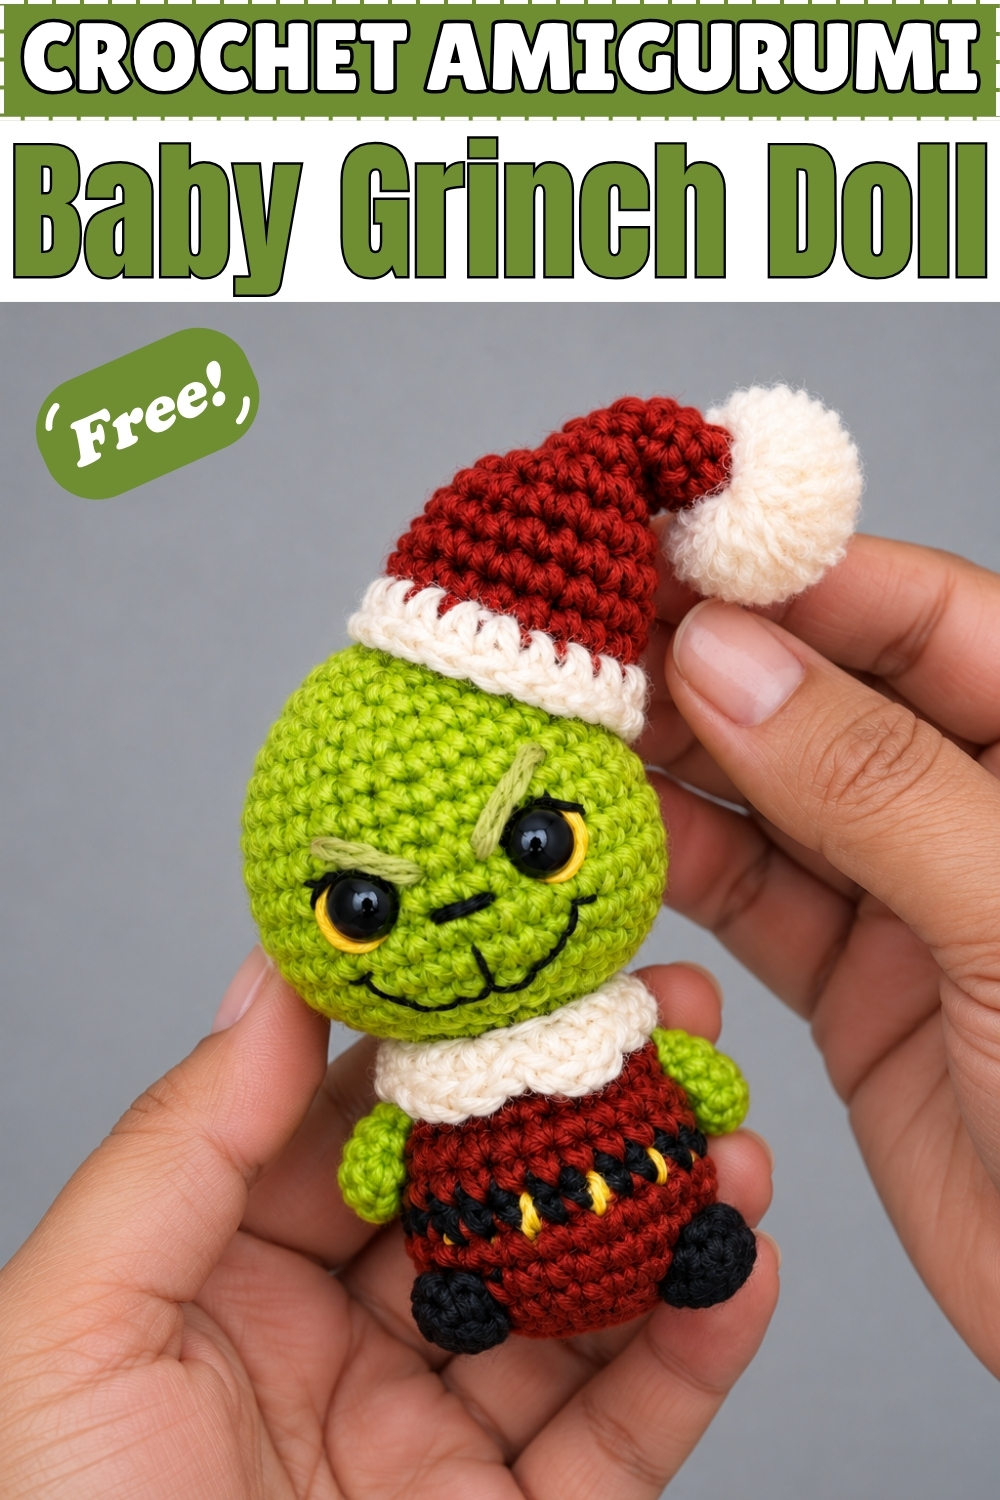
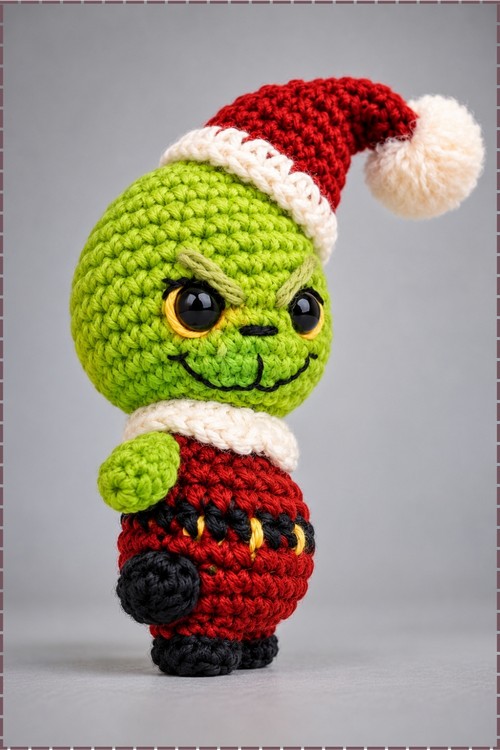
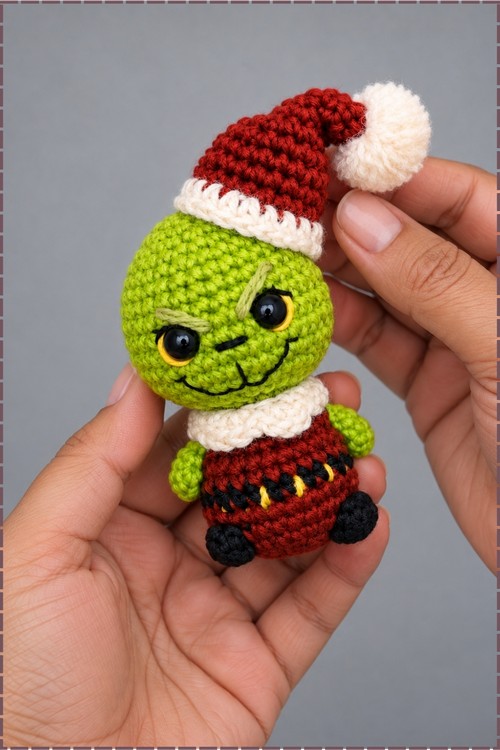
Body and head grow as one continuous piece in this crochet baby Grinch doll, so nothing has to be sewn onto a neck at the end. Boots and hands appear mid round as small bubble stitches worked in black and green. Red yarn carries the suit up to a black belt worked in back loops only. Green takes over at the shoulders and widens straight into the head. Yellow outlines around the eyes give him that sly sideways look. Santa hat and a cream collar finish the whole thing off. Everything stands roughly thumb height.
Quick Facts
- Difficulty: intermediate. The rounds themselves are simple, but the colour changes mid round and the bubble stitches for boots and hands need a steady hand.
- Time: in my experience around four to five hours in total, with the face embroidery taking far longer than you would expect for something this small.
- Finished size: about 7 cm for the body and head together, not counting the hat. Mine came out close to that, though sport weight yarn varies.
Materials and Tools
- Sport or fingering weight yarn, roughly 1 mm thickness, in red, bright green, black, cream white and yellow. My green is a strong lime rather than a muted olive, and that brightness is what makes the face read correctly.
- 2.0 mm crochet hook for every part including the hat.
- Two 7 mm safety eyes in black. Mine are plain domes with no coloured iris.
- Fine black embroidery thread for the lash lines, nose and mouth.
- Small amount of yellow yarn for the eye outlines and the belt stitching.
- Tapestry needle, stitch markers, scissors.
- Polyester fiberfill for stuffing.
- Pet slicker brush for fluffing the pom pom. A stiff toothbrush works if you have no slicker.
Beginner Technique Notes
- SC means single crochet, HDC means half double crochet, DC means double crochet, INC means increase, DEC means decrease, SL ST means slip stitch, BLO means back loops only.
- The bubble stitches that form boots and hands are 5 incomplete double crochets worked into one stitch. Work each double crochet only until two loops remain on the hook, leave them there, repeat into the same stitch until you have all the loops gathered, then pull the final colour through them all at once. The result is a firm round nub that sticks out from the body.
- Back loops only means working under just the back strand at the top of the stitch. The belt round uses this to create a visible ridge, which is the whole point of it.
- Change colour on the last pull through of the stitch before the new colour starts, never at the start of the new stitch, or you get a smear of the wrong colour.
Customization Ideas
- Swap the Santa hat for a plain green one and leave the suit red for a slightly different holiday character.
- Work the suit in dark green with red trim if you want him to clash with the usual Christmas palette.
- Skip the safety eyes and embroider everything in black thread for a baby safe ornament.
- Add a longer hanging loop at the top of the head and hang him directly from a tree branch.
- Use a glittery white for the trim and pom pom so he catches the tree lights.
- Leave the yellow eye outlines off for a softer, less mischievous expression.
- Make a second one in a plain red suit with no belt stitching for a faster version.
The Pattern
Body and Suit
- Round 1: with red yarn, make a magic ring of 6 single crochets and join with a slip stitch. (6)
- Round 2: increase in every stitch around. (12)
- Round 3: 1 SC, 1 INC, repeated 6 times. (18)
- Round 4: 2 SC, 1 INC, repeated 6 times. (24) This flat disc is the underside of the doll and becomes the base he stands on.
- Round 5: work 8 SC in red, change to black on the eighth stitch, then work 5 incomplete double crochets into the next stitch and close them off with red to form the first boot. Continue in red for 6 SC. Change to black again and repeat the 5 incomplete double crochets in one stitch for the second boot, closing with red. Finish the round with 8 SC in red. (24) Both boot bubbles should sit on the same side with 6 stitches between them, which becomes the front of the doll.
- Round 6: 8 SC, 1 SC worked into the black boot stitch, 6 SC, 1 SC into the second black boot stitch, 8 SC. Change to black on the last stitch. (24) Work that single stitch on top of each boot snugly, since a loose stitch here lets the boot flop forward.
- Round 7: working in back loops only, work 24 SC in black for the belt. Change back to red on the last stitch. (24) The ridge left by the front loops is what makes the belt look like a separate strap.
- Round 8: working normally through both loops again, 24 SC in red. (24)
- Round 9: work 6 SC in red, change to green on the sixth stitch, then work 5 incomplete double crochets into the next stitch for the first hand and close with red. Work 10 SC in red across the front. Change to green and work 5 incomplete double crochets in one stitch for the second hand, closing with red. Finish with 6 SC in red. (24) Keep the 10 red stitches facing front so the hands land on the sides, exactly level with each other.
- Round 10: 6 SC in red, 1 SC in green over the first hand, 10 SC in red, 1 SC in green over the second hand, 6 SC in red. (24)
- Round 11: 2 SC, 1 DEC, repeated 6 times. (18)
- Round 12: 1 SC, 1 DEC, repeated 6 times. Change to green on the last stitch. (12) This is the shoulder line, and the colour change here is what divides the suit from the head.
Head
- Round 13: working in back loops only, 1 SC, 1 INC, repeated 6 times. (18) Back loops here create a clean ridge where the collar will later sit, hiding the colour change completely.
- Round 14: 2 SC, 1 INC, repeated 6 times. (24)
- Round 15: 3 SC, 1 INC, repeated 6 times. (30)
- Round 16: 2 SC, 1 INC, repeated 10 times. (40) The head is now much wider than the body, which is correct. The proportions are deliberately top heavy.
- Rounds 17 and 18: 40 SC around for 2 rounds. (40)
- Insert the 7 mm safety eyes between rounds 17 and 18, spaced about 6 stitches apart, then stuff the body firmly before you close any further. On my doll the eyes sit low and close together, which keeps the forehead tall.
- Round 19: 2 SC, 1 DEC, repeated 10 times. (30)
- Rounds 20 to 22: 30 SC around for 3 rounds. (30)
- Round 23: 3 SC, 1 DEC, repeated 6 times. (24)
- Round 24: 24 SC around. (24)
- Round 25: 2 SC, 1 DEC, repeated 6 times. (18) Stuff the head firmly now, shaping the back into a tall rounded dome as you go.
- Round 26: 1 SC, 1 DEC, repeated 6 times. (12)
- Round 27: 1 SC, 1 DEC, repeated 4 times. (8) Cut the yarn leaving a long tail. Leave the hole open for now, since embroidering the face is far easier while you can still reach the inside.
Face
- Using yellow yarn, outline the sides of each eye with a few shallow stitches so the yellow curves around the outer edge of the black dome. Mine has yellow on the outer sides only, not fully circling the eye, and that asymmetry is what gives the sideways glance.
- Using fine black embroidery thread, work the upper lash line across the top of each eye, pressing it slightly down into the stitches so the eyes look half lidded.
- Embroider the small nose centred just below and between the eyes, then run a long curved mouth outward from under it with a short upward tick at each end. Keep the mouth wide and shallow. A deep curve turns the smirk into a plain smile.
- Embroider the eyebrows with green yarn, about 3 stitches wide, going over each one twice for thickness. Angle them down toward the centre so the inner ends almost meet above the nose. These two stitches carry the whole expression, so unpick and redo them until the angle looks right.
- Close the top of the head by weaving the tail through the front loops of the remaining 8 stitches and pulling tight. Pull hard and knot off inside, because the hat will sit directly over this point and any gap shows through.
Santa Hat
- Round 1: with red yarn, make a magic ring of 4 SC. (4)
- Round 2: increase in every stitch. (8)
- Rounds 3 and 4: 8 SC around for 2 rounds. (8) This narrow tube is the floppy tip of the hat.
- Round 5: 1 SC, 1 INC, repeated 4 times. (12)
- Rounds 6 and 7: 12 SC around for 2 rounds. (12)
- Round 8: 2 SC, 1 INC, repeated 4 times. (16)
- Rounds 9 to 11: 16 SC around for 3 rounds. Change to cream white on the last stitch of round 11. (16)
- Round 12: using cream white, work 16 half double crochets around. Fasten off and weave in the ends. (16) The taller half double crochets make the brim stand out from the red, which is why the trim reads as a separate band.
- Pom pom: wrap cream white yarn around two fingers roughly 10 times, tie tightly through the centre, cut the loops, and brush the strands out with a pet slicker until they fluff into a ball. Trim to a neat round shape. Mine is large in proportion to the hat, almost as wide as the brim.
- Sew or glue the pom pom to the tip of the hat.
- Fold the hat so the tip flops to one side and secure the fold with a stitch, then sew the hat onto the head. On my doll the hat sits well back on the head with the tip falling to the right and the pom pom resting near the shoulder.
Collar Trim
- With cream white yarn, make a slip knot and chain 16.
- Starting in the second chain from the hook, work 6 SC.
- In the next chain, work 3 HDC in the same stitch.
- Work 1 slip stitch in the next chain.
- In the next chain, work 3 HDC in the same stitch.
- Finish the row with 6 SC in the remaining chains. The two clusters of half double crochets create the raised bumps that sit at the front of the collar.
- Fasten off, leaving a long tail. Sew the trim around the neck where the green meets the red, with the two bumps centred at the front. Pin it before sewing and check from above that it sits level, since a crooked collar is the first thing the eye catches.
Belt Detailing
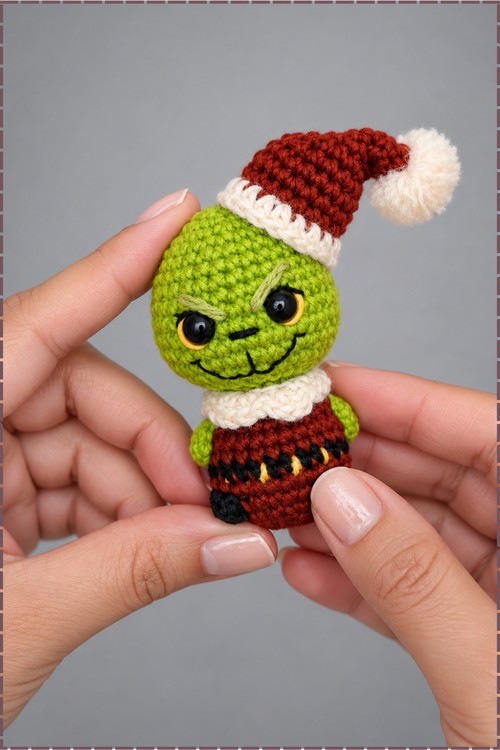
- The belt on my doll has short yellow stitches worked over the black band, which the plain pattern does not include.
- Thread yellow yarn on a tapestry needle and work short vertical straight stitches across the front of the black belt round, spacing them evenly by eye rather than counting. Stop when the front of the belt is covered and leave the back plain.
- Keep every stitch the same length and anchor each one inside the body so nothing shifts when the doll is handled.
Tips and Troubleshooting
- Practise the bubble stitch on a scrap swatch before you reach round 5. Gathering five incomplete double crochets and closing them with a different colour is the one genuinely fiddly move in this pattern, and getting it wrong on the actual boot means pulling out a full round.
- Stuff in small pinches, not handfuls. At 2.0 mm with sport weight yarn the fabric is dense but the pieces are tiny, and one large clump leaves a visible lump through the green of the head.
- Do the face before closing the head. Once that last hole is cinched shut you cannot reach inside to anchor the embroidery, and knots worked on the outside always show on a face this small.
Yarn Substitution
Sport or fingering weight is what gives this doll its fine, smooth surface, and I would not go heavier if you want the face to look like mine. Moving up to DK or worsted still works round for round, but the doll grows to roughly twice the size and the embroidered features get much harder to keep delicate at that scale. Cotton holds the shapes better than acrylic here, especially the boot and hand bubbles, which hold their roundness instead of collapsing. Keep all five colours in the same brand and weight so the suit and head sit at the same gauge.
FAQ
Can I make this safe for a child? Embroider the eyes with black thread instead of using safety eyes, and sew the hat and collar down fully rather than gluing. The pom pom should be stitched through the hat several times, since a glued pom pom will come off.
Why do my boots point sideways instead of forward? The bubble stitches land wherever the round sits when you reach them. Count carefully in round 5 so there are exactly 6 stitches between the two boots, and keep that gap at the front as you continue.
Can I make him without the belt ridge? Yes. Work round 7 through both loops in black and you get a flat band instead of a raised strap. The yellow detailing still works over it, though it sits less prominently.
How do I attach a hanging loop? Use the long tail left at round 27 before you close the head. Chain until the loop reaches the length you want, join it back into the top of the head, and anchor it through several stitches. Add it before the hat goes on so the join hides underneath.